TinyMCE Image Upload Plugin
- Article
- Comment
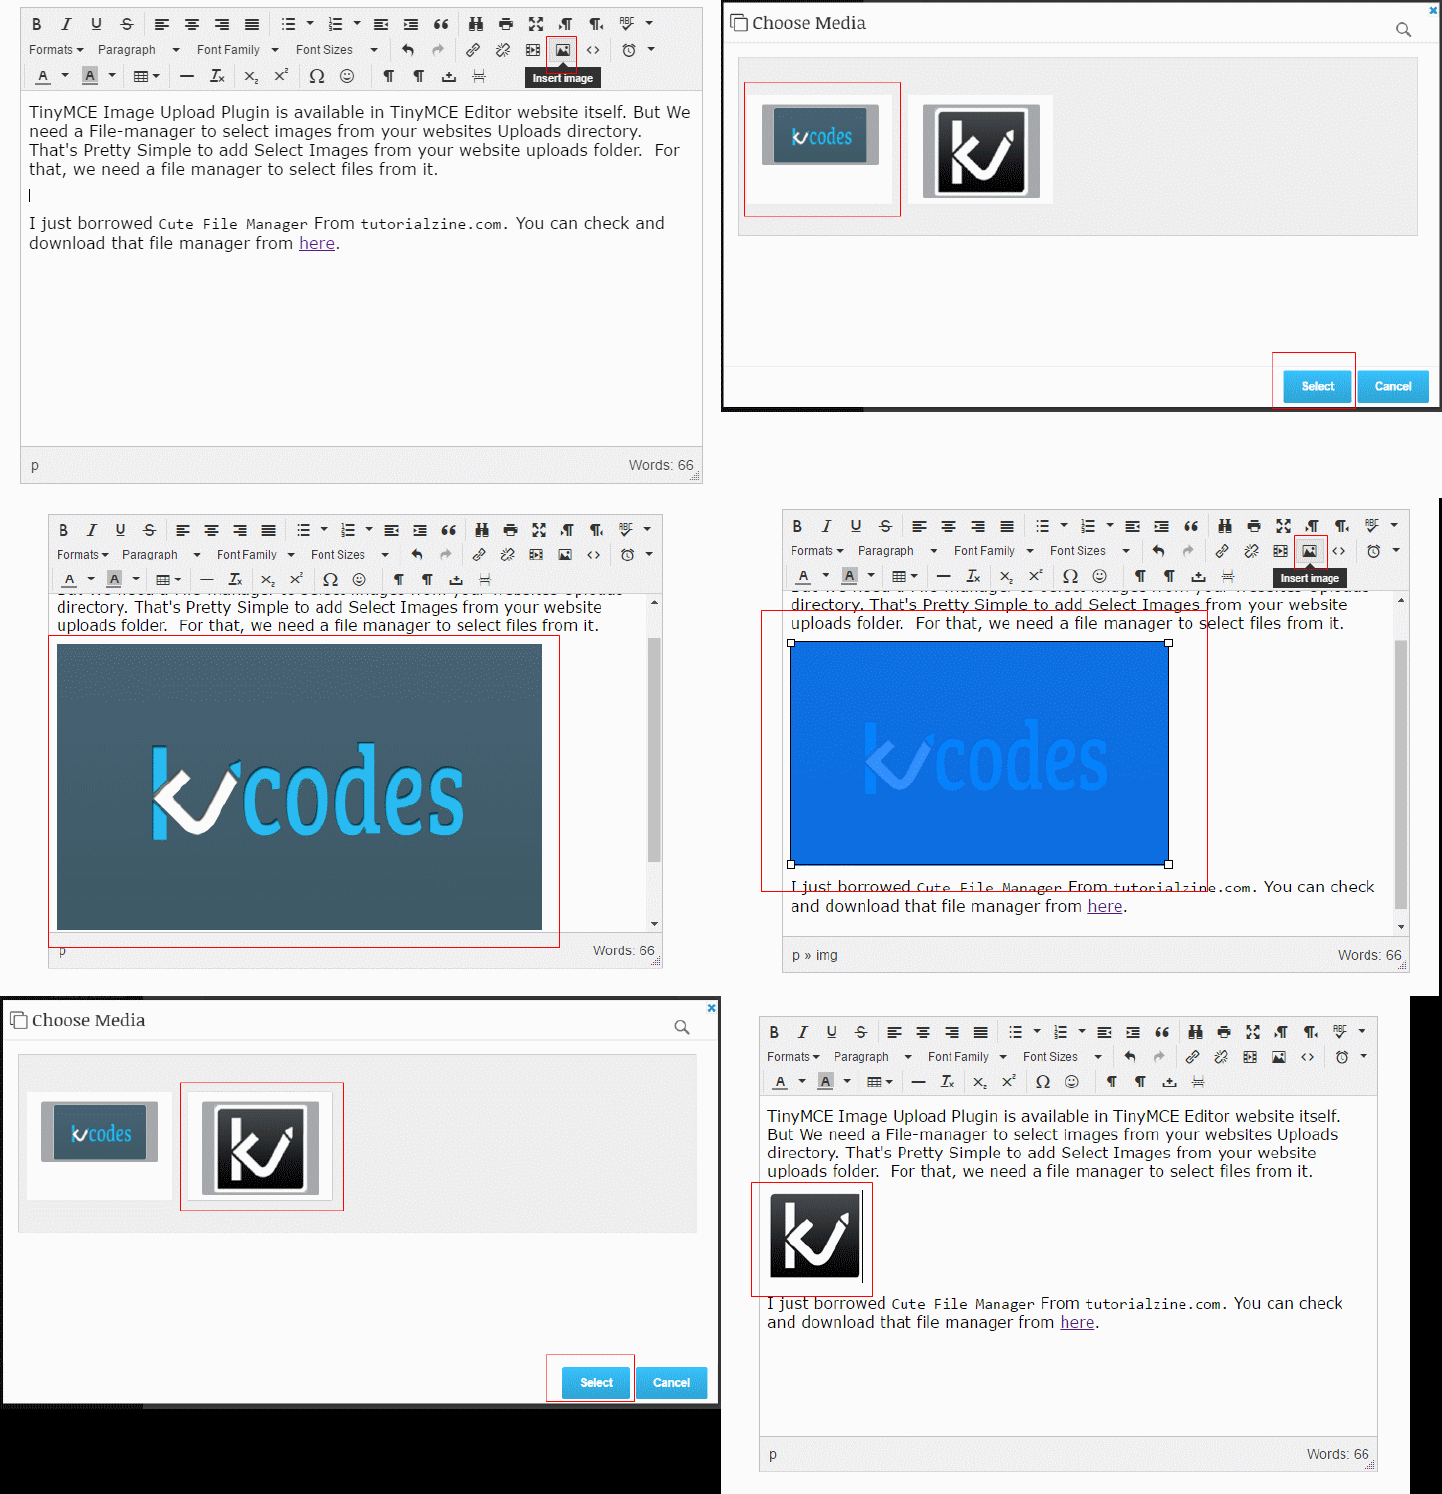
TinyMCE Image Upload Plugin is available in TinyMCE Editor website itself. But We need a File-manager to select images from your websites Uploads directory. That’s Pretty Simple to add Select Images from your website uploads folder. For that, we need a file manager to select files from it. I just borrowed Cute File Manager From tutorialzine.com. You can check and download that file manager from here.
Required Sources:
- TinyMCE Editor 4.4.3
- Cute File Manager
- MagnificPopup
Just collect this things before you start reading the rest of the article.

After making a filemanager with help of tutorialzine, you can use it on the popup, Let’s create a TinyMCE editor with custom Button image.
<textarea id="editor" name="pageContent" placeholder="Content"> </textarea>
<script>
var filechooser_url = 'Your Filemanager url here';

tinymce.init({
        selector: "#editor",
        plugins: [
                "advlist autolink autosave link lists charmap print  hr pagebreak spellchecker",
                "searchreplace wordcount visualblocks visualchars code fullscreen insertdatetime media nonbreaking",
                "table contextmenu directionality emoticons textcolor paste textcolor colorpicker textpattern"
        ],
        toolbar1: " bold italic underline strikethrough | alignleft aligncenter alignright alignjustify | bullist numlist outdent indent blockquote | searchreplace print fullscreen ltr rtl spellchecker",
        toolbar2: "kvimages | styleselect formatselect fontselect fontsizeselect ",

        menubar: false,
        toolbar_items_size: 'small',
		relative_urls : false,
		convert_urls : true,
		setup: function(editor) {
        editor.addButton('kvimages', {
            type: 'button',
            title: 'Insert image',
            icon: 'image',
            id: 'kvimages',
		onclick : function() {
            	editor.focus();
            	$.magnificPopup.open({
			items: {
				src: filechooser_url,
				type: 'iframe'
			}
		});
         }
        });
    });
});
</script>
On our Filemanager, we need to add the select feature and also we need a popup. So Here I Used MagnificPopup So require that too. With your Filemanager, your html and js should be like this.
 <div class="filemanager">

 <div class="search">
 <input type="search" placeholder="Find a file.." />
 </div>

 <ul class="data animated" style="">
 <li class="files images">
 <a id="view_media" href="http://localhost/cms/kv-admin/medias.php?view_id=8" data_id="8" data_url="http://localhost/cms/files/582d56b8df3aa.png" title="../files/582d56b8df3aa.png" class="files">
 <span class="icon image"> <img style="width: 100%; max-height:125px;" src="https://localhost/cms/files/582d56b8df3aa.png"> </span>
 <span class="name">kv-grey.png</span> <span class="details">16 KB</span></a>
 </li>
 <li class="files images">
 <a id="view_media" href="http://localhost/cms/kv-admin/medias.php?view_id=9" data_id="9" data_url="http://localhost/cms/files/582d56b8dfe32.png" title="../files/582d56b8dfe32.png" class="files">
 <span class="icon image"> <img style="width: 100%; max-height:125px;" src="https://localhost/cms/files/582d56b8dfe32.png"> </span>
 <span class="name">kvv.png</span> <span class="details">6 KB</span></a>
 </li>
 </ul>

 <div class="nothingfound">
 <div class="nofiles"></div>
 <span>No files here.</span>
 </div>
 </div>
Here #view_media will be id for all the images associated with a href. Let’s write the selection jQuery for the view_media.
$("#view_media").on('click', function(e){
 e.preventDefault();
 var url_selected = $(this).attr('data_url');
 $("#insert_media").attr("data-url",url_selected);
 $("#view_media").removeClass('selected_image');
 $(this).addClass('selected_image');
 });
Now, This will help you to select image by clicking on it. It will get the URL and add it to the Insert Button. Now, Let’s Write the Insert function to the TinyMCE editor.
$("#insert_media").on("click", function(){
 var insmedia = $(this).attr('data-url');
 if (insmedia != "") {
 parent.tinymce.activeEditor.execCommand('mceInsertContent', false, '<img src="' + insmedia + '">');
 }
 parent.$.magnificPopup.close();
 });
The Above one helps you to insert the image on your TinyMCE editor and close the Popup.
If You really enjoy this article share and like my pages on below social medias. Also Subscribe me to get more Useful Tutorials About Web development on certain areas.

